
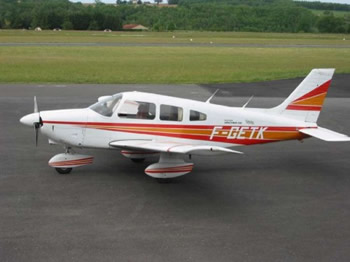
flying the Piper Pa28
by
Gene Whitt
In a Piper accident the pilot
and his flying will cause about 83% of the accidents. Pipers tend to give pilots
more trouble in IFR conditions and at night. Five times as much trouble as in
other aircraft. I personally feel that the cockpit lighting of the Piper is much
inferior to that of the Cessna. Supplemental lighting is very necessary. A Piper
pilot who makes it past the 100-hour mark greatly improves his survivability.
Get AOPA "Piper PA-28 Safety Review which includes all PA-28 articles since
1981. 1-800 638-3101.
--Pilot error causes 8`% of Cherokee accident and 71% of Arrow accidents.
--Continued VFR into IFR conditions was most common related cause.
--Arrows have 50% more night accidents as similar aircraft.
--Fixed gear landing accidents were most common due to long landings.
--Arrow landing accidents were related to hard impact--
Piper built the "Short Wing"
series in the 1940's; they designed into the plane a stall characteristic that
would make it difficult to inadvertently spin a Piper. Stinson aircraft were
made with an elevator stop on the flaps. Full up elevator was possible only with
the flaps down. This was supposed to prevent stalls and spins. Ercoupe designed
an interconnecting rudder with restricted elevator travel. Any turn had built in
coordination.
The Piper had a very thick
airfoil that used laminar flow to assure that lift would be lost very slowly up
to the stall. The wing's design gave a range of attack angles instead of one
critical angle of attack. You could enter a slow stall and the plane would rock
back and forth instead of pitching forward while at a dramatic sink rate. Only
aggressive pitch could get a sharp break and spin. This quality existed in both
high and low wing Pipers. The change to the later tapered wing did little to
change flight characteristics. The critical approach speed changed from slow
with excessive sink when slow to excessive float when fast.
Piper Checkout
Piper checkouts should consist of
two flights. The second flight should be at gross. Pipers have somewhat
different handling characteristics under different loading that are best learned
with an instructor. The pilot who has learned in a Warrior should get his Archer
checkout at full gross.
Several aspects of the low-wing
Piper aircraft need to be discussed during familiarization, training and
checkout. If the following material is not included as required knowledge, what
can go wrong will go wrong. Since most pilots will be transferring their flying
to other types of aircraft it is wise to include cautions as to what differences
exist. A high-time pilot transitioning to a new type of aircraft may have
difficulty overcoming ingrained habits and past experiences. Those who believe
time accumulated, alone, provides invulnerability are putting themselves and
their passengers at risk. The first ten hours are the most likely to produce
aircraft damage.
The
Engine
The Lycoming engine of the Piper
180's is perhaps the best light aircraft engine made. However, due to the
bimetallic construction of its cylinders it can be subjected to avoidable damage
by poor operational and piloting techniques. Specifically, shock cooling of the
engine and cylinders is to be avoided. Power of 1500 or more should be
maintained during all descents. Power off situations should be avoided. The
proper planning of airport arrivals and landing approaches will protect the
engine from damage.
Lycoming Shutdown
1. Lean, operate at 1200 rpm for 1-minute. (While taxiing?)
2. Operate at 1800 rpm for 20-seconds
3. Reduce to 1200 rpm and kill with mixture.
Piper to Piper Transitions
The Piper pilot should be aware that
older Cherokees have a stabilator that is about two feet shorter than later
models. This means that at slower speeds much less control power is available. A
Hershey-bar wing Cherokee at slower speeds may not have sufficient control to
raise the nose. This is especially true at forward C. G. loading. Don't get slow
during flare in the Hershey-bar Cherokees or you may drive the landing gear into
the fuel tank.
Preflight Items
The spinner nose cone on a Piper is
required for flight. It serves as a cooling deflector for the engine air intake.
Because of the great centrifugal forces exerted on the spinner, it is vital that
no pushing or other pressures be applied while moving the aircraft on the
ground. Be sure to check the backing plate and screws of the air filter during
preflight. Ingestion into the carburettor will stop the engine. The cowling
clamps should be checked to confirm that the toe is tucked under. Feeling for
this is better than looking. The bearings of the flap-actuating arm need to be
checked for movement and lubrication. There have been reports that the flap
attachment bolts and holes can cause unexpected flap operation. The brake lines
must be checked for adhering dirt. If ever the cloth cover is letting the
underlying metal mesh show have a mechanic check it.
Dirty Trick Engine
Compartment On Piper's unlatch rear
engine cowling latch prior to pre-flight to determine if student preflight
includes checking latches. Do not start engine without confirming latches
properly fastened.
Checking Tires
The preflight of all aircraft should include rolling the tires. Rolling
assures that all chains are removed and serves as tire check for "flats" that
may be concealed in the wheel fairings. Although retractables pose another
issue, it is advisable on fixed gear low-wing aircraft to retract the flaps
prior to application of brakes. It is possible to lock the brakes and tires of
an aircraft moving in ground effect. In this situation the locked tires will be
quickly "sandpapered" to the cord by the pavement. NRI has a $100 penalty for
pilots determined to have caused flats' on tires.
The main wheel struts need to
have about 8" of chrome showing. It is always advisable to wipe the struts clean
during preflight to help preserve the "o" rings. If a strut is low it may be
because it is stuck rather than because of low pressure. It is possible to give
the strut an assist by carefully backing under the wing tip past the fibreglass
tips and locating the main spar with the back and lifting the wing. This is a
quick temporary fix.
Neutral Trim Set
During preflight the trim should be
set to neutral and the position of the stabilator should be checked against the
metal identification plate just forward of the stabilator of the left side of
the empennage.
Fuel
The
gas tank caps have a notch and a rubber flapper valve with allows air to enter
the tanks as fuel is used. If the operation of this valve is impeded, fuel
starvation may occur. A properly installed fuel cap will have the dirty side in.
It is advisable to use an 18" stick gauge to determine actual fuel consumption
over a period of time. Develop this measuring system where the plane is normally
parked as well as on a level surface. Fuel drained from the sumps can be
returned to the tanks if no contamination exists. Over a period of time every
ounce counts. Gasoline stains under the wings are evidence of hard landings. The
tabs inside the tank indicate a 17-gallon level.
It is possible for the fuel tank
and engine sumps which have spring loaded drains to stick open. When you take a
sample be sure that you let the spring push the sample cup out. If you take it
out it is possible for the spring to become stuck. Debris can make it stick open
and not leak just long enough for you to get into the airplane.
The manual suggested program of
hourly changes give extended flight times with unbalanced weights. Change tanks
at altitude in the vicinity of an airport and prior to descent to pattern
altitude. Be aware
that the loading of the aircraft can greatly decrease the range and greatly
increase the fuel consumption. A heavy aircraft may need fuel 100 miles sooner.
Change tanks on a scheduled basis. Keep a time log of fuel changes. A low-wing
aircraft is twice as likely to have a fuel related accident as is a high-wing.
One way of keeping track of the fuel tank selection is using the minute hand of
the clock to indicate which tank you should be on. Book performance numbers are
for a new aircraft and the best pilot Piper could hire to achieve such numbers,
plan accordingly.
Starting: Pump-Pressure (On-Up)
Post start: Pump-Pressure (OFF-up)
Pre-takeoff: Pump-Pressure (On-up)
1000' AGL Pump-Pressure (Off-up)
Tank change: Pump-Pressure (On-up) I try to change tank just before reaching
proximity airport and leave pump on for 2 minutes.
Pump-Pressure (Off-up)
Emergency: Pump-Pressure (On-up)
Pre-Landing Pump-Pressure (On-up)
Post-Landing Pump-Pressure (Off-up)
Because of the low wing the
electric fuel pump must be operational for all flight. It is a required
preflight check. Any time the fuel pump switch is operated the second check MUST
be the pressure gauge. The fuel pump is normally ON under five conditions.
(1) Starting,
(2) Takeoff,
(3) Landing,
(4) Changing tanks, and
(5) The second item of the emergency checklist after the first item called
"checklist".
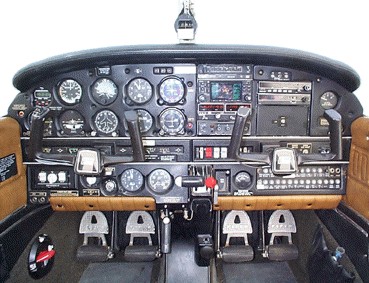
Do not push on rudder during preflight!
Preflight
1. Proper folding of the rain/sun cover to keep the temperature gauge pocket so
that it can be easily located and placed when recovering the aircraft. This
usually means to fold the cover lengthwise from both sides of the aircraft and
then folding from the back to the front.
2. Run an interior cockpit check
of the logbook, fuel selector setting to the left tank, fuel gauge check,
getting cockpit sump checker, and lowering flaps.
3. Begin along the right rear of
the wing, check right tip and leading edge. Unchain right wing, sump wing and
use fuel on rag to clean strut while checking brake lines, flap mounts, and
security of wheel fairings. Poor excess fuel into tank while visually checking
fuel level.
4. Check oil, propeller,
alternator belt, and clean nose strut. Drain engine sump and left wing sump. Use
fuel to clean strut and check brake lines and security of wheel fairings. Pour
surplus into tank when visually checking fuel level.
Piper Oil Check:
Fact is that oil will often creep up the oil stick under certain cooling
conditions. First removal of the day will often give a false high oil level
reading. Failure to wipe stick and re-insert it for a new reading may cause
pilot to depart with far less oil that believed.
5. Check stall warner, leading edge, flap mounts, static and pitot tube, unchain
wing and check tip and ailerons hinges and flaps along the trailing edge of the
wing.
6. Check and identify antennas,
neutral stabilator, unchain tail and return to the nose of aircraft to pull/push
aircraft for tire check. Confirm that luggage door is secure. Squat check
confirms that preflight is complete.
Top of page

On Entering the Cockpit
Care should be taken when entering
or leaving the cockpit to see that wind will not snap the door open. A quick
snap of the door can break the door stop mechanism on the bottom of the door. A
doorstop was installed on 56K in 1993. Weight should not be placed on the door
while entering or leaving since damage to the hinges is likely to occur. All
checkouts should caution against stepping or standing on the painted wing
surface.
The flap handle operates and
locks at 10, 25, and 40 degrees. In the 10-degree position it is very possible
to believe that the flaps are up and locked for a step due to the aileron
position. This may be an illusion caused by aileron position. Whereas, in
reality, they are spring loaded and will not support weight. This condition
could result in severe injury to a departing passenger and a barked shin to one
stepping onto the wing. Set up this condition to demonstrate during the
checkout. Likewise, a passenger on the ground and peering into the cockpit to
observe the pilot could receive severe damage to his kneecaps when the flaps are
lowered. Always "clear flaps" before lowering. The run up check of the flaps
should include visual/manual operation of both extension and retraction through
every notch.
The indent position of both left
and right flaps should be checked in all settings during runup. The flap
operation should be checked through the full range of stop settings, both right
side and left side, down and back up. Asymmetric application of flaps will make
an aircraft uncontrollable.
A special hazard for Cessna
pilots transitioning to Piper. The bar that goes across the cabin just above the
rudder pedals should be presented as a potential hazard. If the pilot's toes are
allowed to protrude over the toe stops on the rudder pedals so as to reach this
bar, it is possible that all directional control and braking can be lost. The
misuse is most likely to occur during landing rollout when feet are moved up
from rudder to brakes. Every pilot should sit in the aircraft and see for
himself how this could happen.
Piper Design Differences
There are several attributes of
Pipers that need to be explained to anyone using them. Cherokee D's had the
overhead hand crank. Works well once you use it. Much less likely to jam that
the between the seat wheel. Could not be made electric.
When Piper went from the
Hershey-bar wing to the tapered wing there was a dramatic shift in the critical
approach airspeed. The short wing required that the pilot never allow the
approach speed get slow. Arrive in ground effect too slow and you would fall
right through it. Result was numerous fuel leaks since tanks were adjacent to
landing gear. The tapered wing gave the opposite problem. Any approach speed
that was slightly fast would cause excessive float. Short runways were the
scenes of numerous overruns.
The knurled wheels to each side
of the cockpit switches control the interior lights and the navigation lights.
Be sure to locate them. The knurled navigational and instrument light
potentiometers and switch combination have been, indirectly, the cause of more
than a few accidents over the years. If the checkout pilot fails to show the
location to a pilot, they are unlikely to be found.
In 1978 Piper changed from the
Hershey-Bar wing to a high aspect, high dihedral, semi-tapered NACA wing with
sweep back occurring at mid span. The angle of incidence was changed to make the
stall move from the root towards the tips. This gave aileron control in the
stall.
The Piper manual says to use C.H.
only when indicated. However, the NTSB has determined that at least 35
unexplainable engine failure accidents occur every year that are likely caused
by carburettor ice. By the time a pilot with reduced power for landing notices
the effects of carburettor ice the engine may be so cool that C. H. will not be
effective. I recommend that C.H. be applied for all power reductions. It doesn't
hurt and may keep you from being an unexplained accident. Good flying habits,
such as applying carburettor heat, need to be maintained.
Because of the possibility of an inexperienced person improperly locking the
door the pilot should make a practice of always being the one locking the door.
The training of every pilot should include the experience of having the door pop
open. The door will only open three or four inches. It makes a loud noise and
makes talking on the radio difficult but poses no danger.
Option #1 is return for a landing.
Option #2 is to proceed to a safe operational altitude.
Slow the aircraft with reduced power and flaps. Open the pilot's window to
reduce the vacuum and slip into the door (right) and attempt to close the door.
This is a two-person operation. The pilot must attend to the flying.
Any deflection of the ailerons
requires the use of rudder for coordination. In the PA28 series you cannot use
ailerons normally without automatic rudder being applied. There is a linkage
between the ailerons and the rudder that tends to keep the ball centred and a
semblance of coordination. I feel this is the reason that Piper pilots tend to
be rudder lazy when compared with pilots flying other aircraft.
The flap/trim engineering
geometry of Piper is quite different from the Cessna. At 1500 rpm Piper Archer
can be trimmed for about 90 mph on downwind and flaps added with very little
trim adjustment required for final approach speed. Each aircraft loading will
require slightly different trim and initial speed. Where electric trim is
available the electric trim can be used throughout the flare to make the yoke
pressures less. This may produce easy to do landings but a go-around with the
trim for nose high and full flaps may over-power your ability to keep the nose
down.
The piper selection of the
stabilator instead of the conventional stabilizer/elevator configuration was
done for several reasons. The stabilator gives a wider range of pitch control
over all flight speeds. The stabilator is lighter with lower drag. The use of
the anti-servo trim design causes the tab to move with the stabilator but the
combination requires more pilot input with any increase in speed or deflection.
. The stabilator utilizes an "antiservo" tab that deflects upward on the
trailing edge of the stabilator as the controls come back. This antiservo tab
generates the necessary control feel and feedback to the pilot to maintain the
necessary "stick force per G" to keep a ham-fisted pilot from easily breaking
the airplane with excessive control movement. This is a safety device improves
longitudinal stability while at the same time limiting the pilot ability to
cause structural damage.
The "stabilator" affects flight
exactly the same as an elevator. However, stability is more difficult to attain
with the stabilator because its larger effective surface increases sensitivity.
There are two different sizes of stabilators on PA 28 aircraft. One is over
three feet less than the other. The control effectiveness of these in landings
makes it very important that the pilot be aware of which stabilator is on the
aircraft. There are distinctive skills required for proper flying of the older
Hershey bar wing with the small stabilator. The older (smaller) stabilator will
run out of effectiveness at slower speeds. This is especially critical when the
aircraft is loaded toward the aft limits. The stall under these conditions will
be unlike any usual Piper stall. It will be abrupt, violent and give a spin all
in the same moment. Fuel consumption will cause a gradual rearward movement in
the weight and balance envelope. Pipers at gross tend to fly tail low with much
greater fuel consumption.
In older models it is possible
for one person to easily check the operation of the stall warner. First be sure
to open the side window. By reaching into the window you can turn on the master
and then by leaning over the wing you can see the stall light go on when the
stall vane is operated. Likewise, in the years since the initial use of the
vibrator on the left magneto all the publications explaining the operation are
out of print. It is important that the new owner/pilot be shown the proper
operation. Single magneto operation should only be for a second or two while
starting.
The Piper wing has some very
fine flight characteristics. The centre of lift moves to the rear as speed
increases. This causes the nose to move downward at higher speed. It is possible
to go one or two hundred feet above a desired altitude and dive before trimming
for level. This effectively puts the aircraft on a step similar to that of a
speedboat. This results in a noticeable speed increase in a lightly loaded
aircraft. The wing also produces a stall that if approached gradually can be
likened to a gentle rocking motion with each motion losing about 100 feet.
Aggravated, done too abruptly with improper rudder input, this stall can be
violent and result in a spin. Spin recovery is normally but should be initiated
immediately since over 1000 feet will be lost per turn. Properly flown both the
Hershey-bar short wing and the tapered wing produce excellent results. Its stall
development pattern is the best in aviation. The 'book' approach speed for the
short and long wing is for a gross weight aircraft. Since stall speeds decrease
at lighter weights, float can be reduced by using slightly slower approach
speeds when below gross. The only approach speed to use is the 'book' speed
adjusted for weight.
Slower than 'book' speeds produce accelerated sink in the short wing Pipers and
require cautious use even with judicious power application. The short
(Hershey-bar) laminar flow wing has a critical speed at which a sink rate may
develop such that the flare may be unable to create the ground effect needed. In
fact, the plane will fall through ground effect and make ground contact violent
enough to damage the aircraft.
The newer tapered Piper wing has
a critical speed at which so much ground effect is produced that the plane has
excessive float. Properly flown both wings produce excellent results. The book
approach speed (76mph-66kts for 56K) is for an aircraft at gross weight. Since
stall speeds decrease at lighter weights, float can be lessened by using slower
approach speeds. Know the speeds; fly the speeds. This wing design requires a
smooth flow of air for best performance. Any ice or frost is a 'no-fly'
condition. Always run your fingers over both wings and tail surfaces. Some
surface ice is invisible to the eye.
In the air, a Piper nose wheel
will move with the rudder. On the ground it moves with the rudder. In a
crosswind landing it moves with the rudder. This means that a cross-control
landing slip in a Piper will have the nose wheel cocked away from the low wing
and into the wind. Severe landing loads are put on the nose wheel if it is
allowed to touch down in this cocked position. It may ever result in a ground
loop. The nose wheel of a Piper should never be allowed to touch the runway
during landing without having been first aligned with the direction of motion.
The engineering geometry of the
Piper nose wheel is different from Cessna. The nose steering is directly linked
to the rudder pedals. Move the nose wheel; move the rudder. For this reason the
rudder should not be moved during preflight. Crosswind landings in Pipers
require a slightly different technique than with Cessnas. Because of the nose
wheel geometry any cross control which will hold the nose straight with the
runway during a crosswind landing will have the nosewheel turned. For this
reason it is important that the nose wheel not be permitted to touch the runway
until it has been straightened. Otherwise, an abrupt turn or ground loop may
occur. During the crosswind landing the rudder effectiveness of the Piper is
less than that available to the Cessna. The rudder area is smaller. Additional
speed may be required to increase rudder effectiveness. As crosswind velocity
increases and approaches the 90-degree angle, the flap settings should be
decreased appropriate to pilot ability.
The stabilator has more upward
movement than downward because the plane flies with the nose lower than its
ground attitude. The reason for the stabilator pivot point is to provide for
pitch stability. If the point were moved forward, the stability would decrease.
Moving the hinge back would increase stability, but the controls would be very
light and require constant adjustment in flight. Stabilator: Up 14 degrees. Down
2 degrees (Plus or minus one degree) Stabilator Tab: Up 3 degrees, Down 12
degrees; (Plus or minus one degree)
The trim tab is designed to
pivot so that it provides larger movement at high angles of attack. This reduces
the loss of control feel at low airspeeds. The trim tab on Pipers is an
Anti-servo tab. When the stabilator moves the wind pushes on the leading edge
and it would have extremely light control forces without the servo. The servo
gives you a feel of the controls. The anti-servo tab adds artificial resistance
by sticking the tab up in the air as you move the elevator the relative wind on
the tap counters the wind effect on the stabilator.
A conventional horizontal stabilizer is fixed and a movable elevator provides
pitch control. The Piper Cherokee has a "fully flying" tailplane called the
stabilator which moves to change the angle of attack.
The centre of lift moves as the
angle of attack changes. As the centre of lift moves away from the hinge point,
it introduces an extra torque that tends to rotate the stabilator around the
hinge farther than the pilot intended.. The more you move the stabilator, the
larger this torque becomes. Torque increase is a "servo" action that makes the
control easier to move the more you move it. Over control is the result.
The anti-servo tab on Pipers
looks like a small elevator on the back of the stabilator, and is hinged so that
it moves in the opposite direction to the stabilator. This gives the 'anti'
effect to the stabilator movement. This countering force on the stabilator evens
out the control forces as the stabilator is moved. The position of this tab
relative to the rest of the stabilator can be changed by the trim wheel. Neutral
trim setting is determined when the servo tab and stabilator are even with each
other and the leading edge of the top of the aircraft identification on the left
side of the empennage.
That tab also doubles as a trim
tab through cables to the cockpit trim wheel. Earlier B, C and D PA28 had an
overhead crank. Because the whole stabilator moves and the wind pushes on the
leading edge when it's deflected, it would tend to have extremely light control
forces. A stabilator has considerable authority when compared to the horizontal
stabilizer and elevator or other aircraft.
The stabilator trim tab is
attached so as to make it deflect more than the stabilator) when the stabilator
is moved. The effect is, that for any trim setting, you get the same effect for
the same control pressure or movement. The trim tab on a stabilator is actually
an anti-servo tab. This gives control feel when you pull or push on the yoke.
The advantages to the stabilator
are, smooth control and less drag. Disadvantages are, an increased ability to
stall the surface unless controlled by the anti-servo, greater weight, lower
control effects at slow speeds.
Piper
Takeoff
The short field takeoff with 25
degrees of flaps will produce a dramatic flight angle. This is especially true
when lightly loaded. Considerable pilot skill and rudder is required to maintain
airspeed at this angle. Unless required in an actual situation it may be better
to accept a higher speed and lesser angle for practice.
If, on takeoff, too much speed
is acquired before rotation, the Piper will give abrupt and excessive pitch up.
This is a poor technique and should be avoided by holding the weight off the
nose wheel as soon as power is applied. Every pilot should know that the
rotational axis while on the round is at the wheels. On liftoff the rotational
axis changes to the centre of lift. Pilot takeoff procedures require a
transitional pitch change during takeoff for this reason. When the plane lifts
off at about 60 mph, lower the nose and fly in ground effect while acceleration
occurs to climb speed. This technique is especially important in heavily loaded
or under-powered Pipers such as the 180 H.P. Arrow and 260 H.P Six.
Piper Landings
Another Piper landing difference
that is a typical transition problem is allowing the nose wheel to make the
initial contact with the ground. This is easy to do if the pilot's desire is to
keep the runway in sight. The pilot, sensing that the nose wheel is about to
make ground contact will jerk the yoke back. Too late!! The jerk on the yoke is
compounded by the decompression of the nose strut. We are now nose high, out of
airspeed, and pushing forward on the yoke. Too late!!! The nose is now falling
with sufficient momentum to smash the nose gear and propeller. If you sense such
a situation developing, GO AROUND.
The landing of a low-wing Piper
is deceptively easy. Deceptive because the perceived good landing is holding
potential dangers. The Piper can be landed flat with the runway in view. It will
feel good. However, a slight increase in speed, a slight forward jerk as ground
contact is made can produce wheel barrowing. This is where the combination of
flaps and ground effect will raise the main wheels slightly off the ground while
the nose wheel becomes the only ground contact. The airplane effectively becomes
an unbalanced wheelbarrow and just as uncontrollable. If you sense such a
situation, GO AROUND. To prevent wheelbarrowing the yoke must be well back while
there is still effectiveness and the nose allowed to fall slowly as the
effectiveness decreases. Stop the yoke, yes. Move it forward, never.
A Cherokee will land and you
will still have the runway in sight. This landing is damaging to the aircraft.
The purpose of learning to do full stall landings, in the first place, is to
reduce the potential for damage to the aircraft. Any landing faster than a full
stall is too fast. If you can see the runway while landing 56K you have not made
a full stall landing. Any pilot who accepts anything less than the best landing
needs to get some instruction. Poor landings cost us all more in maintenance
than it should. The major cause of poor landings is directly related to the
instruction and checkouts given.
Reducing the amount of flaps
used will make possible nose high landings if full yoke movement is included in
the flare. Some Piper students are being taught to land with less than full
flaps but without the required yoke movement. It is easier to teach partial flap
( flat) landings that please the student. However, the student is being taught
to fly without a full deck of cards. Full flaps have a purpose. Flaps are meant
to improve the approach and landing aim for the pilot. Full flaps, except in
crosswinds, are better for this purpose than partial flaps. In addition, with
the advent of the long wing Piper students are being taught that an abrupt
reduction of power to reduce float can be corrected with the yoke and ground
effect. This less than desirable technique can be made to work with long wing
Cherokees. Use of this technique on a Hershey-bar Cherokee or in transition to
Cessnas produces a very hard landing.
Most Piper pilots do not move
the yoke UP. Pulling back and down is the most common action and this fails to
produce the required stabilator movement. Full movement of the yoke will cause
it to move up one inch for every two inches of the last six inches of rearward
movement.
If you are high on final
approach and have applied full flaps, have the power off, and have airspeed
about 75 mph, An additional 5 degrees of flap may be obtained by pulling back on
the flap handle. Pipers slip beautifully even with full flaps.
If you flare too close to the
ground with too much speed 56K will rebound to a higher level as though on
springs. This is caused by too much ground affect. This can result in a low
airspeed at six to eight feet of altitude. GO AROUND because you will no longer
have the ground effect needed for a soft landing. A low speed landing without
the cushion of ground effect will severely damage the aircraft. Gasoline stains
under the wings are frequent evidence of hard Piper landings.
Why does 56K always seem to have
collapsed struts? There is no inherent aerodynamic reason. Piper landings do not
require that the nose wheel hit before or simultaneously with the main gear. It
happens so often that it just seems that way. You can taxi the length of the
runway or do touch and goes in 56K without ever using the nose wheel. It is more
difficult if there are no back seat passengers but it is possible. Keep a bit of
power on.
Some pilots have been taught to
use Piper electric trim to make getting the flare attitude easier. It is easy,
just level off above the runway at slightly below approach speed and hold the
electric trim down. The most desirable of full stall nose landings will occur
with very little pilot input. Why not? I would not recommend this landing to any
pilot simply because in the event of a go-around a trim induced stall is more
than likely to occur. In a PA-28 180 or 181 the yoke pressure to pitch the nose
up may well exceed the strength of the pilot to hold it down.
Go over this idea with your
instructor. It is relatively dangerous if you need to go-around but it might
give you an idea of what things should look like for a landing.
Use a long runway (5000') Flare
at hip height at Vref. Vref is the speed for landing adjusted for weight. If
only two aboard it amounts to about 5 knots. Some differences depend on the type
of Piper wing you have. It makes an even greater difference if you have a short
stabilator (Find the difference by comparing old and new Pipers.) Short
stabilators run out of authority unless you carry power all the way to
touchdown. Carry some power every time if you really want to keep the nose wheel
off the runway.
If you have electric trim as the
plane sinks to the runway run the trim all the way nose up. Make any power
reductions in 100 rpm increments slow and smooth. With manual trim all the way
nose up and use power to keep from ballooning. Pipers are relatively difficult
to get into a nose high full-stall flare unless carrying rear seat passengers.
Questions
1. What will be the differences in a
Piper landing with partial flaps?
2. How do you decide whether to
use 63 or 69 as glide speed with 56K during a landing?
3. Since the Piper Handbook does
not recommend carburettor heat as being required prior to power reduction, what
should the pilot do?
4. Why are high density
altitudes landings likely to be 'firm'?
5. By what means can an ELT be
checked?
6. What is the only solution to be used when you porpoise?
7. What are the five times use
of the electric fuel pump is initiated?
8. How is landing gear geometry
in Pipers different from Cessnas?
9. In what ways is the critical
airspeed between the tapered wing Piper different from than of the Hershey bar
wing Piper?
Answers
1. The nose can be held higher off the runway during the landing. This is a
technique best used when there are no rear seat passengers.
2. Use the lower approach speed
when you are well below gross. Using the higher speed at low gross will cause
excessive float during landing.
3. It does not do any damage to
use heat. NTSB usually has some 35 unexplained fatal accident every year that
may be attributable to carburettor icing in aircraft where carburettor heat
application is not a preferred POH procedure.
4. A sudden change in density
altitude flying can greatly affect how you land an aircraft. The pilot often
becomes conditioned to landings in the cooler air of the fall, winter, and
spring. The ground effect of this period allows an extended float/flare to be
normal. The first high density altitude landing of the year comes as a surprise.
The float and ground effect is not there. The plane will 'fall' through ground
effect unexpectedly before the pilot raises the last six inches of yoke travel.
Cherokees with full flaps tend
to land flat if no rear seat passengers are aboard. It does not take much
inattention to cause the nose wheel to hit before the main gear. This is most
likely to happen in a high density altitude landing. The one second delay in
human reaction is just enough to make the situation progressively worse. Go
around on the first bounce!
5. 56K has a cockpit switch on the left side that allows the ELT to be checked.
This check will allow a radio tuned to 121.5 to receive the ELT. Such a test
should be conducted during the first five minutes of an hour after advising ATC.
No more than three tone cycles. Pull the switch arm out before moving.
6. Go around.
7. Start, takeoff, changing
tanks, emergency, landing
8.The nose gear of the Cessnas
are connected to the rudder pedals by springs. When the nose strut is compressed
these springs along with differential braking allow ground steering. In the air,
the strut extends, is disconnected from the rudder, and aligns with the relative
wind. This that in a crosswind landing with crossed controls the nose wheel will
be aligned with the runway. Pipers had to use a less desirable system to avoid
patent rights. The nose wheel is directly interfaced with the rudder on the
ground and in the air. When you use the rudder you turn the nose wheel. In a
crosswind landing it is important not to allow the Piper nose wheel to touch the
ground until the rudder pedals are straightened.
9. The critical speed for both
types of aircraft is during the landing approach and flare. All landings make
use of ground effect as determined by approach speed and wing span. The short
span wing has a critical approach speed below which the aircraft will 'fall'
through ground effect. The long span wing has a critical approach speed above
which the aircraft will have excessive float.
Speed list for older PA28-140 in
mph
Vso 55
Vs1 64
Vx 80
Vy 89
Vfe 115
Va 129
Vno 140
Vne 170
125 mph true cruise at 75
PIPER Flow Checklist
Restart
--Fuel Pump
--Fuel Selector
--C.H.
--Mixture
--Throttle
--Primer
--Magnetos
--Master
PIPER Fire
Fuel Selector
Fuel Pump
C.H.
Mixture
Throttle
Primer
Magnetos
PIPER CHECKLIST
INTERIOR
Cockpit
Time log check
Release controls
"Clear", lower flaps
Master on, fuel gauges, Master off
Fuel Selector, Left or fullest
Sump cup
EXTERIOR
Right side:
Right flap, aileron, tip, wing
Tiedown, strut, brake lines, farings
Drain sump, check tank, cap (Pour sump cup into tank)
Engine:
Latches, oil, belt, prop, sump
Left side:
Tie down, strut, brake lines, farings
Drain sump, check tank, cap
Stall warner, pitot, static air
Wing, tip, aileron, flap
Empenage:
Antennae, stabilator, rudder, neutral trim
Chain
Luggage door
Walk to nose and roll plane to check tires and clear cable
PRESTART
FUEL PUMP
Flaps "clear", up The fuel pump is to be ON
Window, key for five different operations.
Seats, belts, door 1. Start
Mixture, prime 2. Takeoff
Master, brakes, 3. Changing tanks
Fuel pump, pressure 4. Landing
"CLEAR"
5. Second item on EMERGENCY
checklist
START:
Throttle 1/2"
Idle 1000 rpm, Mixture lean
Fuel pump, pressure
Gauges, radio
Radio Master, ATIS
RUNUP
Into wind, brakes
Controls, flaps
Mixture, 2000 rpm
Mags, Carb heat
Gauges, window
Fuel pump, pressure
Radio, X-ponder
TAKEOFF EMERGENCY
Climb 76 mph, 86 mph, 96 mph CHECKLIST
Fuel pump, pressure at 1000'
1. Checklist
2. Pump & pressure
CRUISE
3. Fullest tank
to 5000' 2450 rpm Lean 4. Best glide
to 10,000 2600 rpm Lean 5. Trim
above 2700 Lean 6. Field/Wind
Change tanks on a scheduled basis. 7. Restart
8. Master, mixture, mags
9. 7700/121.5
10. X 3 all words
USE CARBURETTOR HEAT
REDUCING POWER
Keep a time log of fuel changes on sectional
DESCENT:
Avoid power off descents
Keep power 1500 or above
Fullest tank before descent to land
LANDING
Fullest tank
Fuel pump, pressure
Gauges, instruments
Numbers
Carb, heat, 1500 rpm
Hold heading, altitude
Trim for 86 mph
Flaps 10 degrees
Base:
1500 rpm
Flaps 25 degrees
Trim 86 mph
Final:
1500 rpm
Flaps 40 degrees
Trim 76 mph
FLARE
Yoke full back/up
Power off
Flaps up, brakes
Use of electric trim to assist
flare is dangerous if a go-around
should become necessary.
POST-LANDING
Flaps
Fuel pump, pressure
Carb heat
Gauges
Controls for taxi
SHUT DOWN
121.5 ELT check Controls belted
Radio Master Chains
All electrical Plane locked
Master
Mixture
Mags
Log time
TIEDOWN/LOG TIME/CLEAN COCKPIT/MAINTENANCE
ITEMS
ANOTHER PIPER CHECKLIST
PRESTART START
Flaps "clear' up Start
Window, key Idle 1000, mixture lean
Seats, belt door Fuel pump, pressure
Mixture, prime Gauges, radios
Master, brakes ATIS
Fuel pump, pressure Set alt, HI
"Clear"
RUNUP
PRETAKEOFF
Into wind, brakes Fuel pump, pressure
Controls, flaps Trim
Mixture, 2000 rpm Freq/volume
Mags, Carb heat Strobes
Gauges, window, door Time ck.
Fuel pump, pressure Departure
radio, x-ponder 1st ck pt.
Course/Time
LANDING POST LANDING
Fullest tank Flaps up
Fuel pump, pressure Brakes
Gauges Fuel pump, pressure
NUMBERS Carb heat
Carb heat, 1500 rpm Gauges
Hold heading, altitude Controls for taxi
Notch flaps, trim 86 mph Radio when clear
BASE
Notch flaps, 86mph
FINAL
Notch flaps trim 76mph
SHUTDOWN
EMERGENCY
121.5 ELT ck. Fuel pump, pressure
Radios off Fullest tank
All electric off Speed/76 trim
Master off Field/wind
Mixture Restart
Mags Master, mixture, mags
Log time 77s00, 121.5
Belt controls X-3 "Mayday" all words
Chains Belts/door
Lock plane
The following Piper checklist is
a pocket sized one that is made from a four and one-half by six card that is
folded into quadrants and then cut to the centre from one side. This makes it
possible to keep the all the checklists in a very compact space that can be
clipped to the yoke or kept in a shirt pocket.
Use your own preferred preflight
and put it lengthwise down the left side of the card folded lengthwise. This is
a checklist not a how to do list. A string around your neck with a paper clip is
an easy way to carry and use the list.
Pre-Start
Flaps..................................UP
Controls...................Free & Correct
Parking Brake.........................Set
Seats, Seatbelt, & Harnesses....Adjusted
Circuit Breakers..................Checked
Lights/Fan/A.C. Switches..............Off
Carburettor Heat.......................Off
Fuel Selector................Desired Tank
Avionics - Check 121.5 ATIS,
the......Off
Master Switch..........................On
Fuel Quantity Indicators..........Checked
Speaker "Auto" Button .................In
Starting
Primer.................As required, locked
Electric Fuel Pump.....On, CHECK PRESSURE
Mixture Control..................Full Rich
Throttle.........................1/4" Open
Clear Prop/Area...................."CLEAR"
Magneto/Start Switch........Engage Starter
After Starting
Throttle...................800 to 1000 RPM
Oil Pressure.......................Checked
Electric Fuel Pump.....Off, CHECK PRESSURE
ANTI-COLLISION lights..................On
Alternator output..................Checked
Avionics - On...Transponder 12000 & SBY
Mixture......................Leaned 1 inch
Brakes.............................Checked
During Taxi
Magnetic Compass...................Checked
Gyro Instruments...............Set/Checked
TIEDOWN/LOG TIME/CLEAN
COCKPIT/MAINTENANCE ITEMS
PREFLIGHT
Fuel mark
Chains/cover
Master, controls
pump/pressure
Log, fuel, flaps
Selector
Master--_________
_____________
R flap/wing
Sump/gear (3)
Latches/oil
Belt/prop/gear
Roll
Sump/sump/gear (3)
Warner/pitot/static
L wing/flap
Antennae/stabilator
Trim/rudder
Squat/luggage
EMERGENCY
Checklist
Pump Pressure
Airspeed
Field, wind
Fullest tank
Restart
121.5, 7700
Pre-crash (4)
TANK CHANGE
Start
Takeoff
Checkpoint apts
Prior to Landing
Emergency
PRESTART
Flaps
Seats, belts, doors
Key, prime, throttle
C.H., lock, mixture
Master, brakes
START
Key
Pump Pressure
TAXI
Radios/x-ponder
Frequencies
RUN-UP
Wind, brakes, selector
Controls,2K rpm, mags
Pump Pressure
5-Gauges
1000 rpm
Trim, flaps
PRE-TAKEOFF
Seats, belts, doors
Pump Pressure, strobes
Radio, x-ponder
TAKEOFF
Clearing, mixture
Power, yoke
Rotate 60, Climb 86
Pump Pressure @ 1000'
CLIMB-CRUISE
Lean with EGT
Full throttle at 7K
DESCENT
Power above 1500
Pump Pressure
Change tanks high
Mixture
ATIS, altimeter
Call-up, report
PRE-LANDING
Fullest tank
Pump Pressure
Gauges, instruments
NUMBERS
C. H., 1700 rpm
Heading, altitude
Trim 86, flaps 10
BASE
1500 rpm, flaps 25
Trim 86
FINAL
1500 rpm
Flaps 40
Trim 76
POST LANDING
Flaps up, no brakes
No hurry to clear
C. H, Pump Pressure
Lean, controls
Radio, x-ponder
Order fuel
SHUTDOWN
ELT, radio master
All electrical
Master, mixture, Mags
Log, controls belted
Clean cockpit
BEFORE LEAVING
3 chains, clean shocks
Cover, squat test
Clear, start
Radio, lean, 1k rpm,
Pump Pressure/oil
Piper Light Seal
If landing light seal is not
sufficient to keep water out you should expect standing water to corrode the air
filter. Service Bulletin #975.
Piper vs Cessna
--Seat belt systems are somewhat
different.
--Flap relationship to trim is unique one from the other.
--Best to have your own POH for every aircraft you fly.
--Most of the checklist items will have a different sequence
--The first item of your emergency checklist will be different.
--Manufacturer's instructions related to carburettor heat differ.
--Night and cockpit lighting systems require distinctive explanations.
--The manoeuvring and taxiing blind spots are usually quite different.
--One door system is more likely to accidentally open as the other is.
--Cross wind and ground handling in strong winds distinctly different.
--One flap system is more controllable and consistent than the other is.
--Seat adjustment systems are just different enough to cause difficulties.
--Never plan to immediately fly hard IFR in a newly transitional aircraft.
--The way you hold your hands on the throttle should be quite different
--One fuel system is twice as likely to cause an engine failure as the other is.
--POH numbers and explanations vary year to year and even within the
year.
--You should always make your own aircraft specific operational checklist.
--Confirm the 'neutral' position of the trim setting indicator with actual
trim position.
--Learn all you can about the failure modes of all unfamiliar instruments in
either type.
--Gear retraction and extension of one is less likely to give problems than the
other is.
--The way you use the rudder pedals and brakes have a VERY dangerous difference.
--The preflights are distinctly different with differing critical points where
mistakes occur.
--Get some pre-flight cockpit time for reading the POH and referencing the
cockpit to it.
--Run the trim wheel all the way up and down, manually and electrically to
become familiar.
--Within the same models of each manufacturer there are wide critical airspeed
differences.
--Both manufacturers have made wing, elevator and instrument changes affecting
critical speeds.
--Distinct differences in handling when at gross and near either end of the
centre of gravity range.
--With two exceptions, one type is more likely to have a stall/mush accident in
all its models than the other is.
|
