
flying
a helicopter - an overview
with thanks to the
helicopterpage
A helicopter creates
lift in a different way. Where a fixed wing aircraft has to be moving
to produce lift by the "plane" or angle of attack on the wing, a
helicopter achieves it by manipulating the main rotor blades,
changing the angle at which they meet the air and subsequently the
angle of attack. The drawback with this setup is the need for torque
control with a tail rotor, which bleeds power from the engine every
time it's used. That becomes a factor when you start getting into
advanced manoeuvres.
Terms
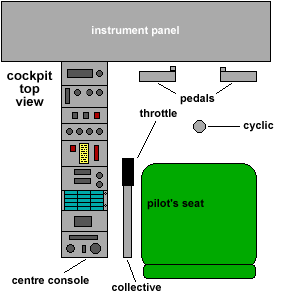
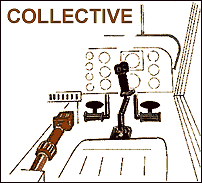
The collective control is the
lever to the left of your seat mounted on the cabin floor. Moving the
collective up or down is what creates pitch change in the rotor
blades, causing you to climb or descend.
You must use one hand
on the control lever that is at your side (the collective control
stick) to raise or lower the helicopter, while at the same time
controlling the throttle (not an easy task).
This is a control which is only found in helicopters and is linked to
the engine power. Moving this up and down changes the pitch of the
main rotors. As the pitch is increased more power is required from
the engines so that the rotor speed is kept at the same level.
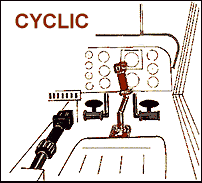
The cyclic control is
the actual "stick." It tilts the main rotor assembly through 360
degrees, allowing forward, backward and sideways flight.
You must use your
other hand on the control lever that is just in front of you (the
cyclic control stick) to move the helicopter forward, backward and to
either side, as if you were in a conventional aircraft.
Moving it forward or back will point the nose of the helicopter up or
down. It does this by varying the angle of the rotor blades as they
go round, tilting the rotor back and forth. When moved left or right
the rotor tilts in that direction and the helicopter banks and rolls.
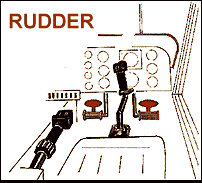
And finally you must
use the tail rotor pedals, on the floor, to control the pitch of the
tail-rotor. For straight flight, the pitch of the tail rotor is set
to prevent the helicopter from turning to the right as the main rotor
turns to the left. The pilot pushes the left pedal to increase the
pitch of the tail rotor and turn to the left. Pushing the right pedal
decreases the pitch of the tail rotor and turns the helicopter to the
right.
The throttle
control is a 'twist-grip' on the end of the collective lever and is
linked directly to the movement of the lever so that engine RPM is
always correct at any given collective setting. The pilot only needs
to 'fine tune' the throttle settings when necessary.
Airspeed
Controlled with pitch - While maintaining altitude, move the cyclic
to change the airspeed. This requires a little coordination, similar
to the throttle and yoke in a fixed wing. In level flight you
increase collective/move the cyclic forward to speed up, reduce
collective/pull the cyclic back to slow down. As you approach your
desired speed, you have to adjust the collective to maintain it. It's
a good idea to practice since you'll do this every time you take off
or land.
Altitude
Controlled with power - Pull the collective up to increase climb
rate, lower it to increase descent rate. This is combined with cyclic
movements to produce constant speed climbs and descents or level
flight. While at cruise altitude and power, any minor altitude
adjustments can be made with the cyclic only.
Behaviour
Helicopters are highly sensitive
to input and very responsive. Slight pressures are required to master
the finer techniques in hovering and landing.
Most helicopters have
no form of adjustable trim. For example, if you pitch down when
levelling off from a climb, the aircraft will continue descending
unless you make an opposite cyclic input from the neutral position.
Once you've levelled out, you need another input to take out that
correction. This characteristic applies to forward, backward and
sideways flight, and on a smaller scale in a hover.
Performance in any
"mode" will be more responsive to input. Whereas a fixed wing may
become sluggish and hard to control at slow airspeeds a chopper stays
just as responsive if not more so.
Power reductions
require some attention. The main rotor blades are your only means of
creating lift, so if you drop the collective completely there's
nothing holding you up, even though the throttle is wide open. All
helicopter pilots are taught to "glide" the helicopter with little or
no power to the ground. A little known fact (much like those seeds
that fall off trees- "twirlybirds" I think kids call them) is that a
helicopter will still "fly" or glide by the simple fact that the
blades will spin on the way down. The landing may be hard but as you
will see not impossible.
Winds and turbulence
play a large role in how you control and master the dynamics. Much as
a fixed wing takes off in the direction of wind so too should your
chopper.
One of the things
that remain constant in fixed and non-fixed wing aircraft is that in
a turn you loose altitude and go nose down without correction. This
doesn't apply to "side" stepping in a hover.
Takeoff
A normal takeoff
is performed in the following fashion .
First, you must make sure the throttle is all the way open (For a
turbine powered helicopter, advanced properly for a reciprocating
engine powered helicopter). Once you have established the proper
operating RPM, then you can pull up slowly on the collective. As you
increase collective pitch, you need to push the left pedal (In
American helicopters...right pedal for non-American models) to
counteract the torque you generate by increasing pitch. (In
reciprocating engined models, you will advance the throttle as you
increase collective pitch). Keep pulling in pitch and depressing the
pedal until the aircraft gets light on the skids. You may sense a
turning motion to the left or right, if so, you may need more or less
pedal to maintain heading.
The cyclic will become sensitive and
(depending on how the aircraft leaves the ground heels or toes of the
skids last) as you continue to pull in pitch and depress the pedal,
you will put in the appropriate cyclic input to level the aircraft as
it leaves the ground. As the aircraft eases into the air, forward
cyclic will be required to start the aircraft in a forward motion. As
the aircraft advances forward, it will gain speed until about 15
knots and then the aircraft will shudder a little as you transition
through ETL (Effective Translational Lift...See the unique forces
page for a more in depth explanation of ETL). As you transition
through ETL, the collective will need to be reduced, the pedal will
need less pressure, and the cyclic will need to be forced forward to
counteract the force against the front of the rotor system.
Failure to push forward will result
in an abrupt nose high attitude and a reduction in forward speed.
After the shudder of ELT is experienced, you will see a marked gain
in forward airspeed, a reduced need for pedal input and a reduced
need for collective pitch as the rotor system becomes more efficient.
The airspeed indicator will most likely jump from zero to 40 knots
indicated airspeed and will smoothly advance as the aircraft goes
faster. Now you have taken off and with a little release of forward
cyclic pressure, the aircraft will establish a climb and continue to
gain airspeed. At this point, the pedals are only used to trim the
aircraft, and most manoeuvres are accomplished by using a combination
of the cyclic and collective controls.
Gently
The largest error made by new
chopper pilots is to "over-control". That means making control
movements that are out of proportion to the corrections required.
It's common in the beginning and keeping corrections small but
immediate is important. Cyclic and tail rotor movements affect each
other and precision is impossible if you're heavy-handed. So before
adding collective, the cyclic should be in the neutral position.
Otherwise you'll start moving the second you leave the ground. If you
lift off with things centred you can devote more attention to heading
and drift. You're less likely to have to make big hazardous
corrections.
Climbs
and descents
Over airports and flat ground you
won't go wrong using the numbers in the pilot operating hand book.
Climbs and descents over rough terrain generally don't work with
those speeds - out of necessity they tend to be slower, and climbs
tend to be steeper. There are a few things to watch in a steep climb.
Try to maintain at least 15-20 knots indicated airspeed. Depending on
the altitude, slowing to zero in a climb can result in an unplanned
descent, and below 20 knots speed bleeds off quickly. Add collective
carefully and don't exceed the limit of the yellow "max continuous
power" range on the torque gauge.
Hovering
A big selling point
of helicopters is that you can land in your backyard. Where then
would be the best place to learn to hover? An airport with a 12,000'
runway and a 7,500' crosswind runway. You want a lot of open space
where you're guaranteed not to hit anything. You want somewhere that
neighbours won't complain about the noise. You want somewhere with
long sight lines to the horizon so that you won't concentrate your
gaze in too close. You want somewhere that you can get fuel when you
run out. All roads lead to the big airport! Generally the tower and
ground controllers will give you permission to practice hovering on
whichever runway isn't be used that day and/or over a seldom-used
taxiway.
Most instructors will start by giving you one control at a time. You
take the antitorque pedals and they handle the cyclic and collective
pitch. You practice pedal turns. Then you take the collective while
the instructor controls the cyclic and pedals. You go up, you go
down. Maybe you land. Then you take the cyclic and the instructor
takes the other controls and ... 1 second later the helicopter is
oscillating like crazy and you hear "I have the controls" in your
headset. Any good instructor will alert you to the fact that you need
to be very light on the controls: "you fly with pressures, not
movements." The instructor will also tell you that there is a bit of
lag between the time that you put in a control input and the time
that the helicopter reacts. What most instructors won't tell you is
how to deal with these facts.
Here are a few tips for handling the cyclic, which controls
forward/back and left/right movement of the helicopter:
 Focus your gaze at
least 1/2 mile in the distance if the sightlines in your practice
area are long enough.
Focus your gaze at
least 1/2 mile in the distance if the sightlines in your practice
area are long enough.
As soon as the
helicopter is handed to you it will start to drift to the right.
The tail rotor is counterbalancing engine torque but at the same
time is pushing the machine to the right. Expect to hold a little
bit of left pressure on the cyclic to avoid this translational
drift.
Don't put in and
hold a control input pressure. Suppose the helicopter is moving
forward a bit. You press back on the cyclic and hold that pressure.
One second later the helicopter has responded to the initial
pressure by arresting its forward creep. One second after that the
helicopter has responded to two seconds of continuous pressure by
rushing backwards at a frightening clip. If the helo is moving
forward, press backwards for a split-second then try to return the
cyclic to a neutral position. See if the helicopter stops creeping.
If so, great. If not, try another little stab of back pressure.
Although every second or two you are doing something with the
cyclic, in any given instant you need not be putting in any cyclic
input. Nudge the cyclic and then return to centre. Nudge and then
return.
After an hour or
two the instructor might be doing more harm than good in handling
the other two controls. Everything is cross-coupled so if he is
messing with the collective or the pedals it will require you to
take action with the cyclic. It is actually easier to handle all
three controls because at least the machine isn't doing completely
unpredictable things from your point of view.
Take a break every
20 minutes by practicing takeoffs, trips around the pattern, and
approaches to landings.
Approaches
One of the keys to a good
approach is maintaining visual contact with your landing area. It's
impossible to adjust your descent rate correctly if you lose sight of
it. Sometimes this means turning the nose slightly with the tail
rotor to keep things in view. That comes with practice. Think of the
approach as you might in a fixed wing by imagining a glideslope and a
touch point that you want to arrive at.
Landing
1) Plan on being at about
200-500ft. above ground or obstacles .5km from the landing area. Try
to gauge your rate of descent by a reference on the ground. If you
reach this target altitude early, hold it until you reach about .2km
from the landing area. With your first couple of tries remember to
keep an eye on your airspeed. it's very common for pilot in training
to overshoot the landing area.
2) Slow to 40 knots
35-37% at about .2km from the landing area and begin to slowly
descend. Things will start to happen fast. Check your descent rate.
It's very important that you don't let your vertical speed get past
300' per minute - adjust power as required. Obstacles permitting, you
want to be roughly as high above ground as the width of the rotor
blades when you arrive at the edge of the landing area. As you get
closer and closer to the edge, gradually slow to 30, then 20. You may
loose sight of the landing area briefly while bringing the nose up to
bleed off some of that airspeed. Whether you're descending or not
while doing this, you'll still have to carefully coordinate pitch and
power. Next to hovering, that's probably the biggest challenge of the
approach. I
3) As you cross the
edge of the landing area, you should be levelling off and continuing
to slow below 10 knots. You may have to reduce power slightly and
bring the nose up to do that. Watch the ground to ensure you remain
moving forward as you drift into position. When the exact spot you
want to land on appears to slide beneath the nose, you'll be in a
good position to reduce collective. Make sure your parking brake is
armed.
4) Ease the cyclic
back to bleed off any remaining momentum, then ease it forward again
to level the attitude indicator when all forward movement stops. At
the same time if the rate of descent is too much add some collective.
Now it's just a matter of keeping an eye on drift and getting the
wheels to make contact with the ground. Keep your rate of descent as
low as possible. Have the Parking brake armed and reduce all power.
|
